
Quick Start Guide / Instructions for the 2A/B Next boards
A STEP-BY-STEP Guide to get your 2A/B boards up and running.
Latest distribution is always found at https://www.specnext.com/latestdistro/
Credits: Super thanks to Phoebus Dokos for putting this information together!

Attention: this is the very first public release of the Next. Things most certainly won’t work as expected, but any problems will be corrected with updates to the firmware as soon as they are reported and we work fixes. Bear with us and, as Douglas Adams wisely teaches, ‘Don’t Panic!’ The current distribution and firmware are still being actively developed. Although most of the functionality is already implemented, there are cases where functions described in this quickstart document may not operate as described. Check the ZX Spectrum Next Facebook Group, the ZX Spectrum Next Official Forum and Website for the most up-to-date information!
The ZX Spectrum Next board 2A is the first public version of the platform. It’s a bare board with all the standard functionalities of the Spectrum Next. This article will inform you of the basics of how to set it up and get it running, and should be considered as a ‘Read Me First’ to the full Next manual.
You’ll need…
- A 9V power adaptor (NOT THE ORIGINAL SPECTRUM ONE!) with + in the middle
- A HDMI, VGA or RGB cable, and TV or monitor to plug it into
- A PS2 keyboard or an original ZX Spectrum case
- A SD card (most brands and sizes should work)
- The contents for the SD card – DOWNLOAD HERE
- Something to house and protect your board during operation
Preparing your SD card…
First things first!
In order to be able to use your Next, you need an SD card that contains the distribution you downloaded above. First you should format an empty card using a FAT16 or 32 file system or use this tool from the SD Association. The distribution files need to be extracted in the root of your card giving you a file and folder structure similar to this:

TBBLUE distribution Folder and File organization
Folder contents
c:/bin/ contains the dot commands
c:/demos/ contains various demos
c:/docs/ contains the most up to date documentation regarding NextOS and various programs that come with the TBBLUE distribbution
c:/FactoryTBU/ contains older firmware and core files which may be of interest for historical and/or testing reasons
c:/games/ contains various games for the ZX Spectrum, ZX Spectrum Next, ZX 80 and ZX 81 machines
c:/nextos/ contains essential files for the operation of NextOS including various drivers and NextOS configuration files
c:/sources/ contains the source code for various programs included in the distribution.
c:/tbblue/ contains all the ROM files which are essential to the operation of your Next as a Next or any other machine it can impersonate (see below)
c:/tools/ contains various tools and testing suites for the hardware of your computer
And… finally….
TBBLUE.FW is the Firmware file which is ESSEBNTIAL for the operation of your ZX Spectrum Next and..
TBBLUE.TBU is the Core which is what makes your Next… well… a Next. It contains all the instructions that reprogram the FPGA circuits to realize all the custom hardware and logic of your computer. Once you do a core “flash” you do not need this file. You can store it in the c:/FactoryTBU/ folder.
Once you are done copying the contents of the distribution archive –WARNING: Copying the archive itself onto the card won’t cut it. You need to actually extract the contents onto the root folder of the SD Card as to mirror the structure above– eject the card properly from your PC or Mac computer and plug it in your ZX Spectrum Next.

The full monty
First and foremost, ensure you have a safe enclosure of some sort to keep your board while it’s operating, something that’s not electrically conductive (plastic, wood, rubber, cardboard). You can damage the board if you short it by placing/using it over materials that conduct electricity, so be careful in this respect.
The board requires 9V DC power. It consumes very little energy, even a small 500mA one is enough unless you want to use peripherals attached to it. We recommend a 9V 1.5A power adapter as a minimum to ensure you have plenty of power available to drive any peripherals.
It’s super important to notice that the 9V power adaptor for the Next has a standard adaptor with the positive (+) in the middle, unlike the original ZX Spectrum that had it on the outside of the plug. Do NOT use a original ZX Spectrum power supply on your Next, it won’t work and it might damage it.
Steps to connect your board:
- Plug the keyboard (PS2 or Speccy), monitor/TV cable
- Insert SD card with the latest OS and hardware support files (DOWNLOAD HERE)
- Plug 9V power adaptor
You should see the board booting and loading the OS for the Next. In case of problems, you’ll see error messages informing you of what’s wrong or failing. In case of no image on the monitor or TV, make sure all cables are connected properly and that the red LED light near the power socket of the Next board is lit, showing the board properly powered. If the LED is off, there’s no power coming into the board, so check your power adaptor.

Quick Start
By default, the ZX Spectrum Next will boot up in Next Native mode, one of the many modes/personalities that your computer can be put into. The copyright message you see in the Next Native Mode reflects the copyright message on a ZX Spectrum +3 enhanced with the +3e disk operating system, of which the ZX Spectrum Next is the logical successor. These are the machines available in the TBBLUE ZX Spectrum Next distribution:
- ZX Spectrum 48K
- Gosh Wonderful 48K ROM (A legally modified 48K ROM by Geoff Wearmouth that’s bug fixed and allows for full keyboard entry)
- Timex Sinclair TC2048
- ZX Spectrum 128K
- Investronica ZX Spectrum 128K
- ZX Spectrum 128K +2
- ZX Spectrum 128K +3e
- ZX Spectrum Next (default)
- ZX 80 (Emulator by Paul Farrow)
- ZX 81 (Emulator by Paul Farrow)
You can select any of these models by holding the SPACE key during the booting process of the computer. Notice, however, that the new selected machine becomes the system’s default, every time you make a new selection.
Additionally the ZX Spectrum Next can behave as a number of additional machines according to the ROM you include in the c:/tbblue/ directory in your TBBLUE distribution SD card and the configuration changes you make at the standard boot configuration file config.ini.
These currently can be:
- Brazilian clones
- Soviet Clones
- A number of official and unofficial modifications of ROMs
The enabling of the extra modes can be as simple as dropping a ROM file into the c:/tbblue/ folder and modifying the config.ini file to match the configuration you want to enable.
For example for a Microdigital TK95 computer you will need a copy of the TK95 ROM placed in your c:/tbblue/ folder and the following line in your config.ini file (also in the c:/tbblue/ folder):
menu=TK95,0,7, tk95.rom
The first TK95 denotes how the name of the personality will appear on the boot menu and the second refers to the ROM filename. The number 0 in the middle denotes machine type. These are: 0 for 48K machines, 1 for original 128K machines and 2 for Amstrad machines. The number 7 denotes the display type for this personality. In this case 7 is HDMI (This is to ensure proper display even for the most stubborn of monitors) For example if you wanted it to say “My Brazilian TK” and the ROM file you had was named myrom.rom then the line would become:
menu=My Brazilian TK,0,7, myrom.rom
Note: The personality that you select upon bootup becomes the default one and your machine will ALWAYS boot in this personality until you change it once again.
Additionally in Next Native mode, software for the ZX80 and ZX81 are supported. For this to work, a special set of ZX80 and ZX81 modified ROM images need to be present inside the c:/tbblue/ folder. These ROMs and their inbuilt ZX80/ZX81 emulators have been kindly provided by their author Paul Farrow which retains the copyright of the emulator software.
Attention: For a full recreation of the original machines you will need (by using the E option in your firmware screen) to remove support for DivMMC. If this support is enabled, you will need (with the exception of Next Native Mode), do two things: First is to rename the file RENAME-TO-WORKesxmmc.rom to esxmmc.romm and secondly provide a distribution of esxDOS (The ZX Spectrum Next requires v.0.8.6beta of esxDOS to operate) as found on esxDOS.org which needs to be placed in a new folder on the TBBLUE system SD Card that will be named c:/sys/. We recommend to NOT modify the contents of the c:/bin/ folder as the versions of the “dot” commands provided by esxDOS do not work well with ZX Spectrum Next. Additionally, please be aware that the standard esxDOS distribution contains a number of unauthorized and/or unknown legality software. SpecNext Ltd and the ZX Spectrum Next team cannot be held liable for use of unauthorized and/or illegal software. By using esxDOS and the software it contains you agree that you’re doing so under your own prerogative.
Expansion ROMs
Currently your brand new ZX Spectrum Next supports additional hardware addons with extra ROMs.
One of these hardware addons is the Next’s Multiface-compatible capability. However for this to be enabled, you will need to both own the ROM for the specific model of the Multiface that applies to the personality in use and place this with a specific filename inside the c:/tbblue/ folder. You will need to provide these images and for copyright reasons we cannot instruct you on how to extract them from your hardware. However there are specialist sites that do carry this information.
These filenames are:
| Personality | Multiface Model | Rom Name |
| 48K/48K Mode in 128K | Multiface1 | MF1.ROM |
| 128K/Investronica 128K | Multiface128 | MF128.ROM |
| +2A / +3 / Next | Multiface 3 | MF3.ROM |
When you turn the ZX Spectrum Next off, all the information in its memory is lost, unless you save it first. Your ZX Spectrum Next uses modern SD memory cards to load and save data, including taking a full ‘snapshot’ of standard 128K and 48K memory maps which, when loaded, will return you right back to what you were doing (even in the middle of a game). Note here that the snapshot capability doesn’t cover the Sprite and palette memories nor the extended Spectrum Next memory map and as such is not suitable for ZX Spectrum Next-specific games and software but only for traditional software or software that’s specially written with the snapshot functionality in mind.
The extra mile
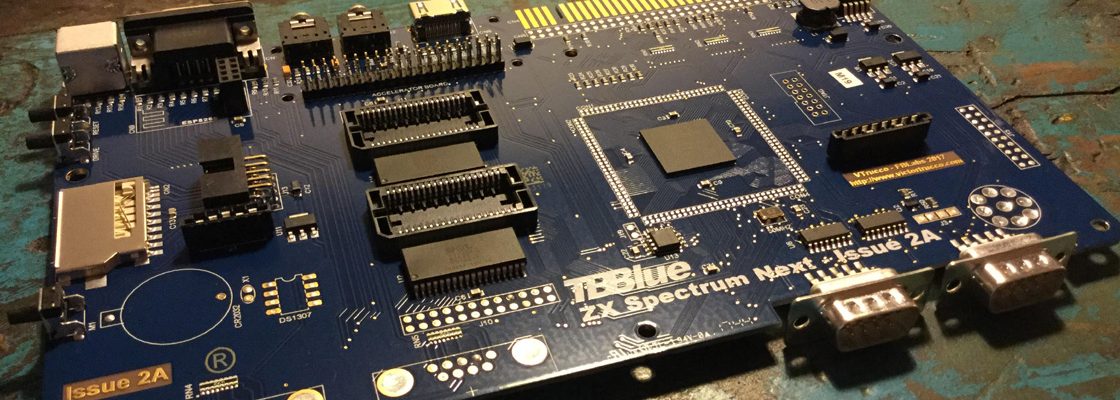
The 2A board features all the expansions and connectors of the full Next. It’s possible to expand its functionalities by adding components for Real Time Clock, ESP network module, extra memory and the Raspberry Pi Zero board as an accelerator. With the exception of the memory upgrade and network module, all these other functions require soldering, therefore you must have an intermediary knowledge of electronics to perform or get a technician to do it for you.
This is how the board looks fully populated (with the exception of the Real Time Clock):

It’s SUPER IMPORTANT to notice a peculiarity when expanding the RAM of the Next: the expansion memory sockets are slightly longer than the memory chip. This is so because sockets of the precise size no longer exist, not even their original molds, so they could no longer be produced. This shouldn’t represent a problem, all you have to do is to properly align the chip as shown here:

Note the four connectors to the right (two on top and two on the bottom) are left empty, as the memory chip is aligned to the left. This is the correct way of slotting the chip into the socket, it won’t work otherwise.
Lastly, you’ll note the Next 2A boards come with a new brand of RAM from IDT. While these should be identical to the Alliance brand used in previous versions, in actuality they are not, thus they require a change to the Next’s firmware which has been already implemented on the board as they ship. The latest firmware available fixes this issue, and enables any combination of RAM brands (Alliance/IDT) to work well. Also, watch a video showing how to install and remove the chips, courtesy of Zeb Elwood:
A few Notes about NextOS
The following are part of the release info on NextOS 1.90 which is the first public beta to accompany the Next board. As this document evolves together with NextOS this information will be superseded by the accompanying documentation of each version and finally the complete manual. Read them below:
What’s next?
The complete ZX Spectrum Next manual goes into further details and should be read in order to take full advantage of your Next 2A board. There are also specific articles on the SpecNext.com portal dealing with editing configuration files, upgrading firmware etc. that are reference for any specific functionalities you intend to explore. Lastly, the forums are the perfect place to ask for help in case something is unclear — rely on your fellow members of the community to guide you through any issues you may have.
Good luck and have fun with the Next!